

Honestly, some nights, after a long day, the thought of cooking anything elaborate just makes me want to order takeout. But then I remember these Cheesy garlic Chicken Wraps, and my kitchen chaos suddenly feels a little more manageable. I first stumbled upon a rough idea for these when I had a fridge full of random bits some leftover chicken, a half-block of cream cheese, and tortillas that were this close to expiring. I thought, 'What's the worst that could happen?' What happened was magic, pure comforting magic. The house filled with the most incredible garlicky aroma, and suddenly, dinner felt less like a chore and more like a warm hug. These wraps aren't fancy, but they hit that sweet spot of easy, cheesy, and utterly satisfying.
I remember one time, I was so excited to get these Cheesy Garlic Chicken Wraps on the table, I forgot to shred the chicken properly. It was more like big, chunky pieces, and honestly, the wraps were a bit harder to roll. But you know what? We still devoured them! It just added to the charm, reminding me that even kitchen 'oops' moments can turn into delicious memories. My kids still talk about the 'chunky chicken wrap night.' It's all part of the adventure, right?
Ingredients for Cheesy Garlic Chicken Wraps
- Cooked Chicken Breast: This is our main player. Use leftover rotisserie chicken if you have it, it's a lifesaver and adds so much flavor. I usually just dice mine up, but sometimes I shred it for a smoother texture.
- Flour Tortillas (large): These are the vehicle for all that cheesy goodness. I like the 'burrito size' ones because they hold more filling. Don't go too small, or you'll have a hard time wrapping them up!
- Cream Cheese (softened): The secret to that creamy, dreamy filling. Make sure it's softened, or you'll be fighting lumps, and nobody wants that mess. I usually just leave it on the counter for an hour or so.
- Mayonnaise: Just a touch adds extra creaminess and a subtle tang. I've tried using sour cream instead, and it works, but mayo just gives it that classic, comforting flavor profile.
- Garlic (minced): The star of the show! Don't be shy here. I usually go a little heavier than the recipe calls for, because, well, garlic. Fresh is best, honestly, but jarred minced garlic is fine in a pinch.
- Shredded Cheddar Cheese: The 'cheesy' part of our Cheesy Garlic Chicken Wraps! A good sharp cheddar really shines, but a mild one works too. I've even mixed in some Monterey Jack for extra melty goodness.
- Onion Powder: Adds a foundational savory note without any onion chunks. I keep this one in my spice drawer at all times, it's such a flavor booster.
- Dried Parsley: For a bit of color and a fresh, herbaceous touch. I sometimes swap this for fresh chives if I have them hanging around in the fridge.
- Salt & Black Pepper: Season to taste, always. Don't forget to taste the filling before you wrap everything up. It's a game-changer!
- Olive Oil: Just a little for browning those wraps to crispy perfection. The smell of it heating up with the wraps is just delightful.
Instructions for Cheesy Garlic Chicken Wraps
- Prepare the Chicken Filling:
- First things first, let's get that chicken mixture ready. In a medium bowl, combine your softened cream cheese, mayonnaise, minced garlic, onion powder, dried parsley, and a good pinch of salt and black pepper. Stir it all together until it's super smooth and creamy. This is where the magic starts to happen! Then, fold in your cooked, diced or shredded chicken and about half of the shredded cheddar cheese. Give it a good mix, making sure every piece of chicken is coated in that luscious, garlicky, cheesy goodness. Take a little taste, adjust the seasonings if you think it needs a bit more oomph. I often find myself adding an extra dash of garlic powder here, oops!
- Assemble the Cheesy Garlic Chicken Wraps:
- Now for the fun part: assembling! Lay out a flour tortilla on a clean surface. Spoon a generous amount of your chicken and cheese mixture onto the bottom third of the tortilla, leaving a little space on the sides. Don't overfill it, or you'll have a hard time rolling, and trust me, I've been there with fillings spilling out everywhere! Sprinkle a bit more of the remaining shredded cheddar cheese over the chicken mixture. Then, fold in the sides of the tortilla, and starting from the bottom, roll it up tightly, like you're tucking in a little blanket. This step always makes me feel like a pro, even if my first one is usually a bit lopsided.
- Preheat and Prep for Browning:
- Next, grab your trusty non-stick skillet or a cast-iron pan. Drizzle in just a tablespoon or so of olive oil and set it over medium heat. You want it warm enough to get a nice crisp, but not so hot that it burns the tortilla before the cheese gets melty. While the pan warms up, get all your assembled Cheesy Garlic Chicken Wraps lined up and ready to go. This way, you can move them from your workspace straight to the pan without any awkward fumbling. I always forget this part and end up juggling hot wraps, honestly!
- Brown the Cheesy Garlic Chicken Wraps:
- Carefully place your assembled wraps, seam-side down, into the hot skillet. Don't overcrowd the pan, I usually do two at a time, maybe three if my pan is big enough. Let them cook for about 3-4 minutes on each side, or until they're beautifully golden brown and crispy, and you can see that cheese starting to ooze out a little bit. The smell at this stage is absolutely heavenly that toasted tortilla, the melting cheese, the garlic... oh, it's just the best! Keep an eye on them, as they can go from golden to burnt pretty quickly.
- Ensure Cheese is Melted Through:
- After browning both sides, you want to make sure that cheese inside is perfectly melted and gooey. Sometimes, if the filling was a bit cold, it might need a little extra help. You can pop the wraps into a preheated oven at 350°F (175°C) for 5-7 minutes, or just cover the skillet with a lid for a minute or two on low heat. This traps the steam and helps everything get wonderfully melty inside. I've definitely cut into a wrap too early only to find solid cheese, which is a bit of a letdown, so don't rush this part!
- Serve Your Cheesy Garlic Chicken Wraps:
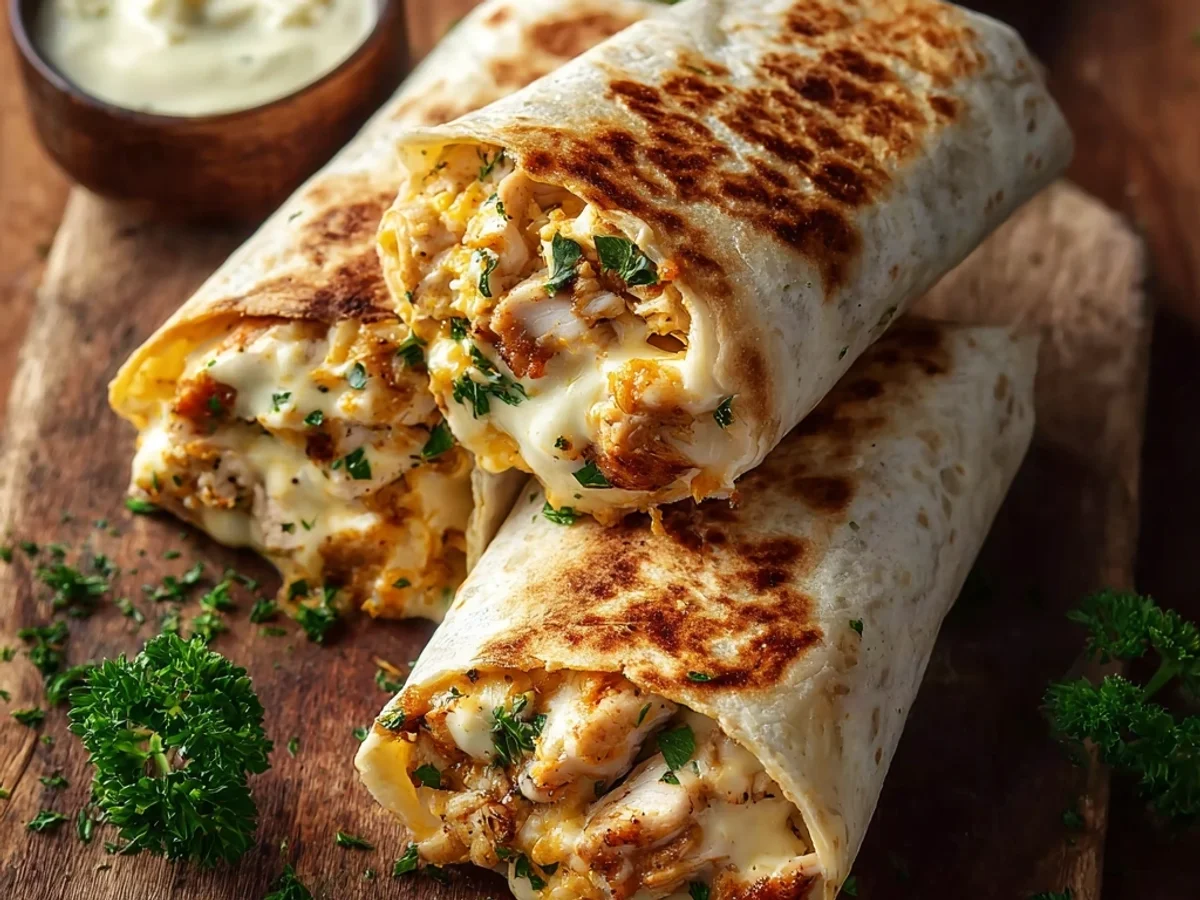
- Once your Cheesy Garlic Chicken Wraps are golden, crispy, and oozing with cheesy goodness, carefully remove them from the pan. I like to let them rest on a cutting board for just a minute or two before slicing them in half diagonally. This makes them easier to handle and shows off that delicious cross-section. Garnish with a sprinkle of fresh parsley or chives if you're feeling fancy. They're best served warm, right off the pan, when everything is at its peak deliciousness. The crunch of the tortilla and the creamy, savory filling is just a dream!
There's something so satisfying about seeing everyone's faces light up when these Cheesy Garlic Chicken Wraps hit the table. It’s messy, sure, with cheese sometimes escaping the edges, but that's part of the charm. I remember one dinner where my little one accidentally dropped half of hers, and we just laughed and scooped it right back up. It’s not about perfection, it’s about sharing good food and making happy memories, even the slightly chaotic ones!
Storage Tips for Cheesy Garlic Chicken Wraps
So, you've made a batch of Cheesy Garlic Chicken Wraps, and maybe, just maybe, you have some leftovers. Lucky you! The chicken filling itself can be made ahead and stored in an airtight container in the fridge for up to 3 days. This is a huge time-saver for busy weeknights. Once assembled and cooked, these wraps are best eaten fresh for that ultimate crispy-cheesy experience. If you do have cooked leftovers, store them in an airtight container in the fridge for 1-2 days. Reheating can be a bit tricky, I usually pop them in a toaster oven or air fryer at around 350°F (175°C) for 5-7 minutes until they're heated through and re-crisped. I microwaved them once, and the tortilla got a bit sad and chewy so don't do that lol. The filling can get a little dry if overcooked when reheating, so keep an eye on it.

Cheesy Garlic Chicken Wraps Ingredient Substitutions
Life in the kitchen is all about making do with what you've got, right? If you don't have chicken, cooked turkey or even some seasoned ground beef would work for these Cheesy Garlic Chicken Wraps. I tried it with leftover Thanksgiving turkey once, and it was surprisingly delicious! For the cheese, feel free to use your favorite melty variety Monterey Jack, mozzarella, or even a spicy pepper jack would be fantastic. If you're out of cream cheese, a thicker Greek yogurt mixed with a little mayo could work, but it won't be quite as rich, I've tried it and it's... kinda okay. No fresh garlic? Garlic powder is your friend, just use about 1/2 teaspoon for every clove. And if you want to sneak in some veggies, finely chopped spinach or bell peppers could be mixed into the filling, though I haven't personally tried that yet!
Serving Your Cheesy Garlic Chicken Wraps
These Cheesy Garlic Chicken Wraps are pretty substantial on their own, but a fresh side always brightens things up! I love serving them with a simple green salad dressed with a light vinaigrette that tangy crispness really cuts through the richness of the wraps. A bowl of warm tomato soup on a chilly evening? Yes please, this dish and a rom-com, that's my kind of night. For a quick lunch, sometimes I'll just have them with some carrot sticks and a pickle. And for dipping, a little ranch dressing or even some extra marinara sauce if you're feeling adventurous (I didn't expect that to work, but it totally does!). They're versatile enough for a quick weeknight dinner or a casual get-together with friends.
Cultural Backstory of Cheesy Garlic Chicken Wraps
While Cheesy Garlic Chicken Wraps aren't tied to one specific ancient culinary tradition, they're a beautiful example of modern comfort food, pulling inspiration from various corners of the kitchen. The idea of wrapping fillings in flatbreads is ancient and global, from Mexican burritos to Middle Eastern shawarma. The 'cheesy chicken' combo, though, feels very much like an American diner classic, a bit like a deconstructed hot pocket or a fancy grilled cheese. For me, this recipe became special because it evolved out of necessity using up leftovers and needing something satisfying without much fuss. It embodies that spirit of home cooking where you take familiar ingredients and transform them into something new and comforting, a dish that feels like it's been around forever, even if you just invented it in your own kitchen chaos last week.
Honestly, these Cheesy Garlic Chicken Wraps have become a staple in my home, a little beacon of deliciousness on those frantic weeknights. They just have this way of making everything feel a bit more relaxed, a bit more joyful. The golden, crispy tortilla, the warm, garlicky chicken and cheese inside... it’s just pure comfort. I hope you give them a try and maybe, just maybe, they'll become a favorite in your kitchen too. Don't forget to share your own kitchen adventures with these wraps!

Frequently Asked Questions about Cheesy Garlic Chicken Wraps
- → Can I make the chicken filling ahead of time for these Cheesy Garlic Chicken Wraps?
Absolutely! I do this all the time. You can mix up the chicken and cheese filling a day or two in advance. Just store it in an airtight container in the fridge, and it'll be ready for assembly when you are. Makes busy weeknights so much easier!
- → What if I don't have cooked chicken for Cheesy Garlic Chicken Wraps?
No problem! You can quickly boil or pan-fry a chicken breast and then shred or dice it. Honestly, a rotisserie chicken from the grocery store is my secret weapon here. It saves so much time and adds great flavor.
- → My Cheesy Garlic Chicken Wraps aren't getting crispy. What am I doing wrong?
Hmm, are you overcrowding the pan? That's a common mistake I've made! Make sure you're not putting too many wraps in at once. Also, ensure your pan is hot enough before you add them, and use just a little oil to help with the browning.
- → How do I store leftover Cheesy Garlic Chicken Wraps?
If you have any left, store them in an airtight container in the fridge for 1-2 days. For reheating, I swear by the toaster oven or air fryer. It helps get that crispiness back. Microwaving them makes them a bit soft, which I personally don't love.
- → Can I add vegetables to the Cheesy Garlic Chicken Wraps filling?
You totally can! I haven't tried it myself, but I bet finely chopped bell peppers, spinach, or even some corn would be a nice addition. Just make sure they're finely diced so they don't tear the tortilla when you roll it up!