

You know those days? The ones where the weather outside is just… meh, and all you want is a hug in a bowl? That’s exactly how I landed on this Homemade Baked Mac and Cheese. I remember one blustery Saturday, staring into the fridge, feeling utterly uninspired. My little one was grumbling about being bored, and honestly, so was I. Then it hit me: the ultimate comfort food. I pulled out all the stops, grated every block of cheese I could find, and even had a minor flour-puff incident that coated half the counter. But the smell, oh, the smell! It filled the house with such a warm, inviting aroma, and suddenly, the gray day felt a whole lot brighter. This dish just has a way of turning things around, bringing smiles and quiet contentment.
Honestly, my kitchen often looks like a cheese explosion after making this. One time, I got a little too ambitious with the cheese grating and ended up with a mountain of cheddar that almost slid off the counter. My dog, bless his heart, thought it was an early Christmas. Oops! But even with the occasional mess, the process of bringing this Homemade Baked Mac and Cheese together is always a joy. It’s a messy, cheesy, wonderful adventure, and the result is always worth the clean-up.
Ingredients for Your Homemade Baked Mac and Cheese
Creamy Base
- Elbow Macaroni: This classic shape holds onto the creamy sauce beautifully. I've tried other shapes, but honestly, macaroni just feels right for Baked Mac and Cheese. Don't overcook it, please!
- Unsalted butter: The foundation of our roux and that rich, buttery flavor. Use good quality butter here, it makes a difference, I swear.
- All-Purpose Flour: Our roux buddy! This is what helps thicken the sauce to that dreamy, luscious consistency. I tried gluten-free flour once, and it worked, kinda, but the texture was a bit different.
- Whole Milk: No skim milk, just don't! The fat content in whole milk is crucial for a truly creamy, rich sauce that won't separate. I speak from experience here, trust me on this one.
Cheese Blend
- Sharp Cheddar Cheese: This gives our Homemade Baked Mac and Cheese that classic, tangy bite. Always grate your own, pre-shredded has weird anti-caking stuff that makes it melt oddly.
- Gruyère Cheese: For a nutty, sophisticated depth of flavor. It melts like a dream and adds a lovely complexity to the cheese sauce.
- Monterey Jack Cheese: This melts super smoothly and adds a mild, creamy balance to the sharper cheeses. It’s my secret weapon for that gooey pull.
Flavor Boosters
- Dijon Mustard: A tiny bit, just a teaspoon, enhances the cheesy flavor without making it taste like mustard. It’s a magic trick, honestly.
- Nutmeg: A pinch of freshly grated nutmeg (or ground) elevates the cheese sauce, giving it a warm, almost savory sweetness. It's a must for me!
- garlic Powder: Adds a subtle, warm garlic note without overpowering the cheese. I often add a little more than the recipe says, because garlic, right?
- Onion Powder: Similar to garlic powder, it provides a background savory note that just makes the cheese taste more...cheesy.
- Salt & Freshly Ground Black Pepper: Seasoning is everything! Taste as you go, especially with the salt, because different cheeses have different salt levels.
Topping & Garnish
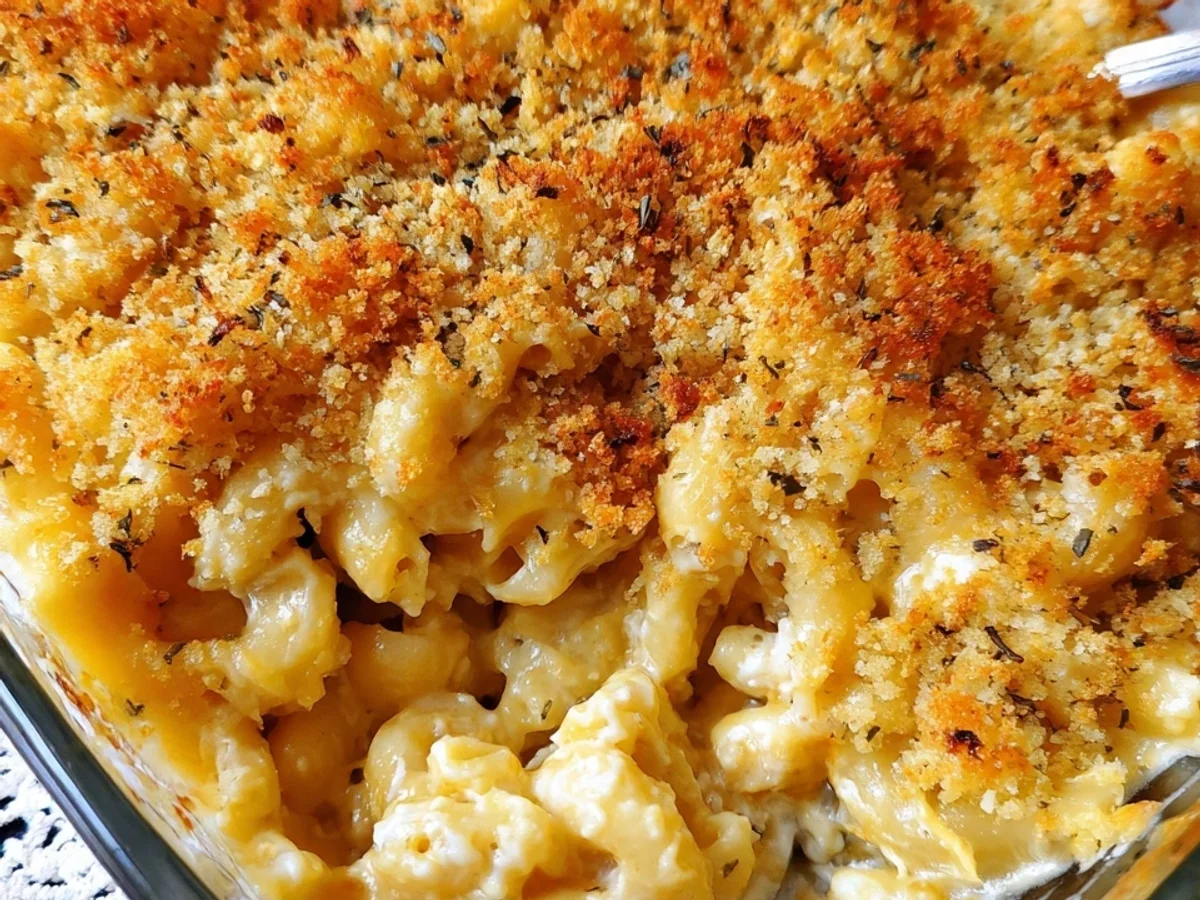
- Panko Breadcrumbs: For that irresistible, golden, crispy topping. Panko is superior, folks, don't skimp on this one!
- Grated Parmesan Cheese: Mixed with the panko, it adds extra savory depth and helps achieve that beautiful crust.
- Fresh Parsley: A sprinkle of chopped parsley at the end for a pop of color and fresh herbiness. It just makes it look fancy, even if it's not.
Crafting Your Homemade Baked Mac and Cheese
- Boil the Pasta:
- First things first, get a big pot of water boiling. Add a generous pinch of salt this is where the pasta gets its first layer of flavor, and honestly, I always forget to salt the water enough. Cook your elbow macaroni according to package directions, but aim for al dente, maybe even slightly undercooked. Remember, it'll bake in the oven later, so we don't want mushy pasta! Drain it well, don't rinse it, and set it aside. You'll see the steam rising, and that's your cue that the magic is about to begin.
- Make the Roux:
- In a large, heavy-bottomed pot or Dutch oven, melt your butter over medium heat. Once it's shimmering, sprinkle in the flour. Whisk, whisk, whisk! You're making a roux, and this is where you build the foundation of your creamy sauce. Keep whisking for about 1-2 minutes until it forms a smooth paste and smells a little nutty, like toasted flour. My first few times, I almost burned the roux, so keep an eye on it! It should be a pale golden color, not brown.
- Whip Up the Cheese Sauce:
- Gradually, and I mean gradually, pour in the whole milk, whisking continuously to prevent lumps. This is key for a silky smooth sauce! Bring it to a gentle simmer, still whisking, until the sauce thickens enough to coat the back of a spoon. It feels so satisfying when it starts to thicken, almost like a little kitchen victory! Reduce the heat to low, then stir in your Dijon mustard, nutmeg, garlic powder, onion powder, salt, and pepper. Give it a good taste here, you want those seasonings to sing.
- Melt the Cheese:
- Now for the best part! Remove the pot from the heat. Add your grated cheddar, Gruyère, and Monterey Jack cheeses a handful at a time, stirring until each addition is fully melted and smooth before adding more. This prevents the cheese from clumping up. I remember one time, I dumped it all in at once and ended up with a slightly lumpy situation oops! The aroma of melting cheese is just incredible at this stage, it makes the whole kitchen smell amazing.
- Combine & Transfer:
- Once your cheese sauce is gloriously smooth and creamy, add the cooked, drained macaroni to the pot. Stir it gently until every single piece of pasta is coated in that luscious, cheesy goodness. Transfer this mixture into your prepared 9x13 inch baking dish. Don't worry if it's a little messy, that's just part of the charm of a homemade dish. Spread it out evenly, admiring your handiwork.
- Top and Bake Your Homemade Baked Mac and Cheese:
- In a small bowl, mix the Panko breadcrumbs with the grated Parmesan cheese and a tiny drizzle of olive oil (optional, but it helps with crispiness). Sprinkle this mixture evenly over the top of your macaroni. Bake in a preheated oven at 375°F (190°C) for 20-25 minutes, or until the topping is golden brown and crispy, and the sauce is bubbly around the edges. When you pull it out, it should look and smell like pure comfort, a truly golden masterpiece.
Making this Homemade Baked Mac and Cheese always brings back memories of my grandmother’s kitchen. She had this way of making everything feel special, even a simple weeknight meal. There’s something so satisfying about seeing the golden crust bubbling, knowing all that cheesy goodness is hiding underneath. It’s not about being perfect, it’s about that feeling of warmth and connection you create in your own home.
Homemade Baked Mac and Cheese Storage Tips
This Homemade Baked Mac and Cheese is fantastic for leftovers, which is a win in my book! Once it's completely cooled, cover the baking dish tightly with plastic wrap or transfer it to an airtight container. It'll keep beautifully in the fridge for up to 3-4 days. I've found that reheating it gently in the oven (covered with foil to prevent drying out) at around 300°F (150°C) is best. Microwaving it once resulted in the sauce separating a bit and getting a weird texture so don't do that lol, unless you're in a real pinch and don't mind! If you want to prep ahead, you can assemble the entire dish, cover it, and refrigerate it for up to 24 hours before baking. Just add an extra 10-15 minutes to the baking time if it's going in cold.

Homemade Baked Mac and Cheese: Ingredient Swaps
I’ve experimented with so many different cheeses for this Homemade Baked Mac and Cheese! For the cheese blend, feel free to swap in Fontina, White Cheddar, or even a little Smoked Gouda for a truly unique flavor. I tried smoked gouda once, and wow, it was a whole mood, gave it a delightful smoky depth. If you don't have elbow macaroni, penne or cavatappi work well too, just make sure they're al dente. For a gluten-free version, use GF pasta and a 1:1 gluten-free flour blend for the roux. I've had decent results with that, though the sauce might be slightly thinner. You could also add a pinch of cayenne pepper to the sauce for a subtle kick, or some cooked, crumbled bacon into the mix for extra savory goodness. Honestly, play around with it!
Serving Your Homestyle Baked Mac and Cheese
This Homestyle Baked Mac and Cheese is a star all on its own, but it also plays well with others! For a complete meal, I love serving it alongside a fresh, crisp green salad with a light vinaigrette that little bit of acidity cuts through the richness beautifully. Roasted broccoli or asparagus are also fantastic companions. As for drinks, a crisp white wine like a Sauvignon Blanc or even a light-bodied red like Pinot Noir can be lovely. For non-alcoholic options, a sparkling cider or just good old iced tea works perfectly. This dish and a good rom-com on a Friday night? Yes, please. Or as a side dish for some slow-cooked BBQ ribs that’s a winning combination in my house!
The Heartwarming Story of Baked Mac and Cheese
Baked Mac and Cheese has such a rich, comforting history, deeply rooted in American culinary tradition, though its origins stretch back to European cheese and pasta dishes. For me, it’s not just food, it’s a connection to countless family dinners and potlucks. I remember my aunt bringing her version to every holiday gathering, a huge pan of bubbly, golden goodness that was always the first to disappear. It’s evolved from a humble dish into a beloved staple, a true symbol of comfort and home. Every time I make this Homemade Baked Mac and Cheese, I feel a sense of continuity, carrying on those warm traditions in my own kitchen, adding my own little quirks along the way. It’s a dish that tells a story of simple pleasures and shared joy.
And there you have it, my Homestyle Baked Mac and Cheese. It might not be fancy, but it’s real, it’s comforting, and it always hits the spot. Seeing that golden, bubbly crust and knowing what cheesy goodness awaits underneath? That’s pure kitchen magic. I hope it brings as much warmth and happiness to your table as it does to mine. Don’t forget to share your own kitchen adventures with this dish, I love hearing about them!

Frequently Asked Questions About Baked Mac and Cheese
- → Can I make this Homemade Baked Mac and Cheese ahead of time?
You sure can! I often assemble the dish a day before and keep it covered in the fridge. Just add an extra 10-15 minutes to the baking time. It's a lifesaver for busy weeknights, honestly!
- → What’s the best cheese blend for Baked Mac and Cheese?
My go-to is sharp cheddar, Gruyère, and Monterey Jack for balance and melt. I once tried just mozzarella, and it was way too stringy! Experiment with what you have, but always include something sharp for flavor.
- → How do I avoid a gritty or separated cheese sauce?
The trick I learned the hard way: always melt your cheese off the heat, a handful at a time, stirring until smooth before adding more. And grate your own cheese! Pre-shredded has additives that can cause grittiness.
- → How should I store leftover Homemade Baked Mac and Cheese?
Cool it completely, then store it in an airtight container in the fridge for up to 3-4 days. Reheat gently in the oven, covered with foil, to keep it from drying out. My microwave attempts have been... less than ideal, texture-wise.
- → Can I add other ingredients to my Baked Mac and Cheese?
Absolutely! I've tossed in cooked bacon, caramelized onions, or even some roasted veggies. A little pinch of cayenne pepper gives it a nice subtle kick. Be brave and experiment, that's half the fun!