

The first time I tried dragon chicken was at this tiny Indo-chinese place near my college honestly, I had no clue what I was ordering. The name sounded intimidating, but one bite of that crispy, saucy, perfectly spiced chicken and I was completely hooked. The way the sweet and spicy sauce coated every piece, with that hint of smokiness from the peppers... it was like nothing I'd ever tasted. Now, after way too many attempts (and a few kitchen disasters), I've finally nailed this dragon chicken recipe that brings all those bold, addictive flavors right to my home kitchen.
I'll be real my first attempt was a complete disaster. I somehow managed to burn the chicken while the sauce turned into this weird, gloopy mess. My kitchen looked like a tornado hit it, and I ended up ordering pizza. But hey, that's how we learn, right? After a few more tries (and watching way too many YouTube videos), I figured out the secrets to getting that perfect crispy texture and glossy sauce that makes this dish so addictive.
Ingredients
- Boneless chicken (1.5 lbs): I always go for thighs because they stay juicier, but breast meat works too if that's your thing. Cut them into bite-sized pieces not too small or they'll dry out, learned that the hard way
- Cornstarch (1/2 cup): This is what gives you that incredible crispy coating. Don't even think about using regular flour, it just doesn't hit the same. I've tried potato starch too and it works great
- Soy sauce (3 tbsp): Go for the good stuff if you can. I use dark soy sauce for that deeper color and flavor it makes such a difference compared to the light stuff
- Tomato ketchup (4 tbsp): I know it sounds weird but this is key for that glossy, sweet base. Heinz works best in my experience, don't judge me
- Red chili sauce (2 tbsp): Sriracha is my go-to, but any good hot sauce works. Adjust based on your heat tolerance I like mine pretty fiery
- Ginger-garlic paste (1 tbsp): Fresh is always better but honestly, the store-bought paste saves so much time and tastes almost as good
- Bell peppers (2 medium): Red and yellow look gorgeous, but use whatever you've got. They add that perfect crunch and sweetness
- Green onions (4 stalks): These add such a fresh pop at the end. I always buy extra because I snack on them while cooking
Instructions
- Prep the Chicken:
- Cut your chicken into uniform pieces about 1-inch cubes work perfectly. Pat them completely dry with paper towels (this step is crucial for crispy coating). Season with salt and pepper, then toss with 1 tablespoon soy sauce. Let it marinate for 15 minutes while you prep everything else. I learned this trick from my mom the brief marinade makes such a difference in flavor. Don't skip the drying step, trust me on this one.
- Create the Coating:
- In a large bowl, mix cornstarch with a pinch of salt and pepper. Add the marinated chicken pieces and toss until every piece is completely coated I use my hands for this because it's way more effective than a spoon. The coating should look slightly thick and powdery. If it looks too wet, add more cornstarch. This is where the magic happens for that crispy texture we're after.
- Fry the Chicken:
- Heat oil to 350°F in a deep pan or wok. I test with a small piece of chicken it should sizzle immediately. Fry in small batches so you don't overcrowd the pan. Each batch takes about 4-5 minutes until golden brown and crispy. The sound changes when they're ready you'll know! Remove with a slotted spoon and drain on paper towels. The smell at this point is absolutely incredible.
- Make the Dragon Sauce:
- In a small bowl, whisk together ketchup, remaining soy sauce, chili sauce, ginger-garlic paste, and 2 tablespoons water. Taste and adjust more chili sauce if you like heat, more ketchup if you want it sweeter. I always add a tiny splash of vinegar for tang. This sauce should be glossy and smooth. If it's too thick, add a bit more water.
- Stir-fry Everything Together:
- Heat 2 tablespoons oil in your wok or large pan over high heat. Add bell peppers and stir-fry for 2 minutes until slightly charred but still crisp. Add the sauce mixture and let it bubble for 30 seconds it'll thicken slightly. Now add your crispy chicken pieces and toss quickly to coat. The key is speed here so the chicken stays crispy while getting coated in that gorgeous sauce.
- Final Touch and Serve:
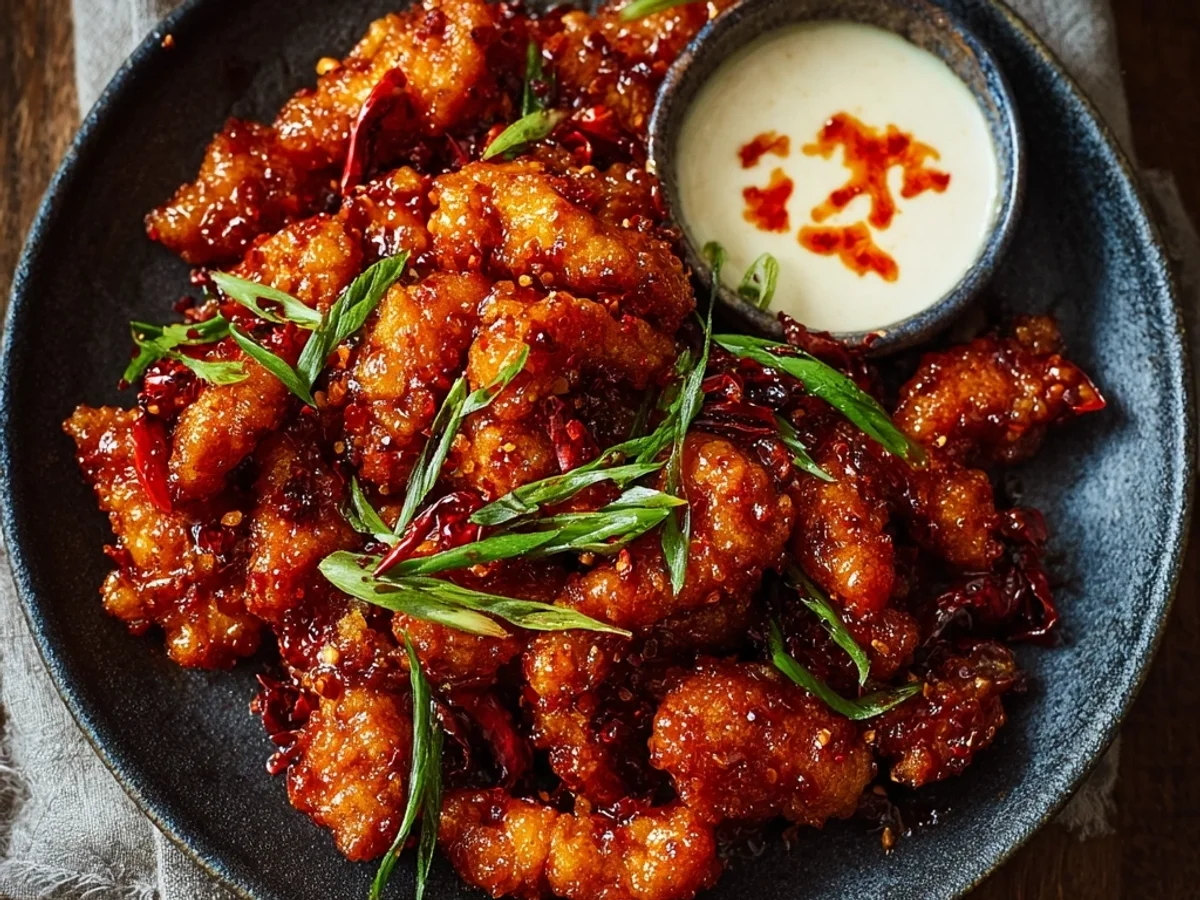
- Remove from heat and immediately garnish with chopped green onions and maybe some sesame seeds if you're feeling fancy. The dish should look glossy and vibrant, with the chicken pieces beautifully coated but still maintaining some of that crispy texture. Serve immediately over steamed rice or noodles. The aroma should be making everyone in the house come running to the kitchen right about now.
The first time I nailed this recipe, I literally did a happy dance in my kitchen. There's something so satisfying about getting that perfect balance of crispy and saucy, sweet and spicy. My partner still talks about that first successful batch apparently I was grinning like an idiot while we ate. Now it's become our go-to when we want something that feels special but doesn't require hours in the kitchen.
Storage Tips
Honestly, dragon chicken is best eaten fresh, but life happens and sometimes you have leftovers. Store the sauced chicken in the fridge for up to 3 days in an airtight container. Here's the thing though reheating is tricky. I've tried the microwave and it just makes everything soggy and sad. Your best bet is reheating in a hot skillet for a few minutes to crisp things up again, or even better, pop it in a 400°F oven for 5-7 minutes. The sauce might separate a bit, but it still tastes amazing. Don't freeze this one I tried it once and the texture was just wrong when thawed.

Ingredient Substitutions
Ran out of cornstarch? I've used potato starch with great results, and even all-purpose flour in a pinch (though it's not as crispy). No ketchup? Mix tomato paste with a bit of sugar and water works surprisingly well. For the chili sauce, I've substituted everything from hot sauce to sambal oelek depending on what's in my fridge. Vegetarians can totally use paneer or cauliflower florets instead of chicken just adjust the cooking time. Bell peppers can be swapped with snap peas, broccoli, or whatever veggies you've got lurking in your crisper drawer. The key is keeping that sweet-spicy-tangy sauce ratio intact.
Serving Suggestions
This dragon chicken is incredible over steamed jasmine rice the sauce soaks in just right. But honestly? I've had it with fried rice, noodles, even wrapped in warm tortillas for a fusion twist that worked way better than expected. Pair it with some cucumber salad to cool down the heat, or go full indulgent with garlic naan. Drink-wise, an ice-cold beer or lemonade cuts through the richness perfectly. For date nights, I dim the lights, light some candles, and serve this with chopsticks it feels fancy even though it's basically elevated comfort food. The colors are so vibrant it photographs beautifully too.
Cultural Backstory
Dragon chicken is part of that amazing Indo-Chinese cuisine that developed in Kolkata's Chinatown it's basically Chinese cooking techniques with Indian flavors and ingredients. The "dragon" name comes from the fiery red color and bold flavors that are supposed to be as fierce as the mythical creature. What I love about this dish is how it represents that beautiful fusion of cultures. It's not traditional Chinese food, and it's not traditional Indian food, but it's this incredible third thing that's become beloved in its own right. Every time I make it, I think about how food evolves and travels and becomes something new and wonderful.
This dragon chicken recipe has become more than just a dish in our house it's become a celebration meal. Whenever someone has good news to share or we just want to treat ourselves, this is what I make. There's something about the process, from that satisfying sizzle of the chicken hitting the oil to the gorgeous glossy sauce coating everything, that just feels like joy. I hope it brings that same happiness to your kitchen too.

Frequently Asked Questions
- → Why isn't my chicken staying crispy after adding the sauce?
This was my biggest struggle too! The trick is working fast and not letting the sauced chicken sit. Toss quickly and serve immediately. Also make sure your oil was hot enough during frying that initial crispy coating is everything.
- → Can I make this less spicy for kids?
Absolutely! I make a milder version by using sweet chili sauce instead of hot chili sauce, and adding a bit more ketchup. My nephew loves it this way, and you can always add hot sauce on the side for the adults.
- → What if I don't have a deep fryer or wok?
No worries I use a regular heavy-bottomed pot with about 2 inches of oil. A candy thermometer helps with temperature, but I just test with a small piece of chicken. Even a large skillet works if you're careful about oil depth.
- → How do I reheat leftovers without making them soggy?
Skip the microwave completely! I reheat in a hot skillet for 2-3 minutes, stirring constantly, or pop them in a 400°F oven for 5-7 minutes. It won't be exactly like fresh, but it's pretty darn close.
- → Can I prep any of this ahead of time?
You can definitely marinate the chicken overnight, and I often make the sauce a day ahead. The bell peppers can be chopped in advance too. Just don't coat and fry the chicken until you're ready to serve that's when the magic happens.