

Oh, hey there, friend! Pull up a chair, because I've got a story for you. Remember that little Indian place we used to hit up in college? That's where my love affair with Indian Chicken Curry began. I was hooked, but always a bit intimidated to make it myself. Years later, after some epic fails (and some pretty amazing successes!), I finally cracked the code. This isn't just a recipe, it's a journey, and I'm so excited to share my go-to version of this rich, aromatic, and utterly comforting dish with you. Get ready to fill your kitchen with the most incredible smells!
Okay, so confession time! The first time I tried to make this Indian Chicken Curry, I got a little too enthusiastic with the Kashmiri red chili powder. I thought, 'More color, more flavor, right?' Oops. My husband took one bite, started sweating, and then politely asked if we had any yogurt. Let's just say we had a very vibrant, but very spicy, dinner that night! Lesson learned: a little goes a long way, hon.
Gathering What You Need for the Perfect Indian Chicken Curry
- 2 lbs boneless, skinless chicken thighs, cut into 1 1/2-inch pieces: Honestly, chicken thighs are the secret weapon here. Boneless, skinless, cut into nice bite-sized pieces. They stay so much juicier and more tender than breast meat, especially with the longer simmer time this Indian Chicken Curry needs. Trust me, I’ve tried breast meat in the past, and it just doesn’t have that same luscious texture. Thighs absorb all those amazing spices like a dream, making every piece bursting with flavor. Don't skimp on the good stuff!
- 3 tbsp ghee or vegetable oil: Ghee! Oh, sweet, nutty ghee. It brings such an incredible richness and depth of flavor to your Indian Chicken Curry that vegetable oil just can't quite replicate. It's that authentic touch, you know? If you don't have ghee, good quality vegetable oil works, but I always, always recommend ghee if you can get your hands on it. It just makes everything sing, from the sautéed onions to the final simmer.
- 2 large yellow onions, finely chopped: These aren't just filler, folks. Finely chopped yellow onions are the foundation, the sweet, savory bedrock of our curry. You'll be cooking them down until they're golden and almost caramelized, which takes time but is SO worth it. This step builds immense flavor and a beautiful thick base for the sauce. Rushing this? A common mistake, and one that changes the whole profile of the dish. Patience is key!
- 1 tbsp fresh ginger, grated: Fresh ginger, grated, adds that unmistakable zing and warmth. It's vibrant, a little spicy, and just wakes up your taste buds. Don't even think about using powdered ginger here, it's just not the same, honestly. I usually grate it right over the pan to get all those fresh juices in there. It’s part of that aromatic trio that makes the whole house smell heavenly when you're cooking.
- 1 tbsp fresh garlic, minced: Garlic, glorious garlic! Minced fresh garlic is another non-negotiable aromatic. It brings that pungent, savory depth that balances the sweetness of the onions and the warmth of the spices. Like ginger, fresh is best, always. Together, ginger and garlic form the soul of so many Indian dishes, and this curry is no exception. They just meld together to create something magical.
- 1 tsp ground turmeric, 2 tsp ground coriander, 1 1/2 tsp ground cumin, 1 tsp Kashmiri red chili powder: Ah, the spices! This quartet is the heart of the curry. Turmeric for color and earthy notes, coriander for citrusy warmth, cumin for deep, savory goodness, and Kashmiri red chili powder for that beautiful red hue without overwhelming heat. These aren't just powders, they're layers of flavor that transform simple ingredients into this complex, delicious dish. Toasting them properly is key, otherwise, they can taste raw, and nobody wants that!
Your Step-by-Step Guide to Making Indian Chicken Curry
- Step 1: Prep Chicken & Aromatics:
- First things first, get your mise en place on! Chop those onions finely no cheating with big chunks, hon. Grate your ginger and mince your garlic. Cut the chicken thighs into even 1 1/2-inch pieces. This prep work is crucial for a smooth cooking process later. Trust me, there's nothing worse than scrambling for ingredients mid-sauté. Having everything ready means you can focus on building those incredible layers of flavor for your Indian Chicken Curry.
- Step 2: Sauté Onions Golden:
- Now, for the magic! Heat your ghee or oil in a heavy-bottomed pot over medium heat. Add those finely chopped onions and get ready to stir. And stir. And stir some more! This isn't a sprint, it's a marathon. You want them to get beautifully golden brown, almost caramelized. This step takes patience, probably 15-20 minutes, but it develops so much sweetness and depth, which is the absolute foundation of an amazing Indian Chicken Curry. Don't rush it, okay?
- Step 3: Add Ginger, Garlic, Chili:
- Once those onions are singing, it's time for the aromatics! Toss in your grated ginger, minced garlic, and that slit green chili. Oh, the smells! Stir constantly for just about 1-2 minutes until fragrant. Be careful not to burn the garlic, it can turn bitter so fast, and we definitely don't want that ruining our beautiful Indian Chicken Curry. You'll know it's ready when the kitchen is filled with that unmistakable, delicious aroma.
- Step 4: Toast Aromatic Spices:
- This is where the curry truly comes alive! Add your ground turmeric, coriander, cumin, and Kashmiri red chili powder to the pot. Stir them into the onion-ginger-garlic mixture for about 30 seconds to a minute. You're 'blooming' them, releasing their essential oils and intensifying their flavors. The kitchen will smell incredible, like a proper Indian Chicken Curry is about to happen. Just don't let them burn, or they'll taste gritty and bitter. Keep that heat medium-low!
- Step 5: Simmer Chicken Curry:
- Now, for the star! Add your chicken pieces to the pot. Stir to coat them completely in that gorgeous spice mixture. Let them sear for a few minutes until they lose their raw pinkness. Then, if you're adding any liquid (like a splash of water or broth, which sometimes I do for a saucier curry), add it now. Cover, reduce heat to low, and let it gently simmer for 20-25 minutes. This is where all those flavors marry and the chicken gets super tender. This is the Indian Chicken Curry happening!
- Step 6: Finish with Yogurt, Garnish & Serve:
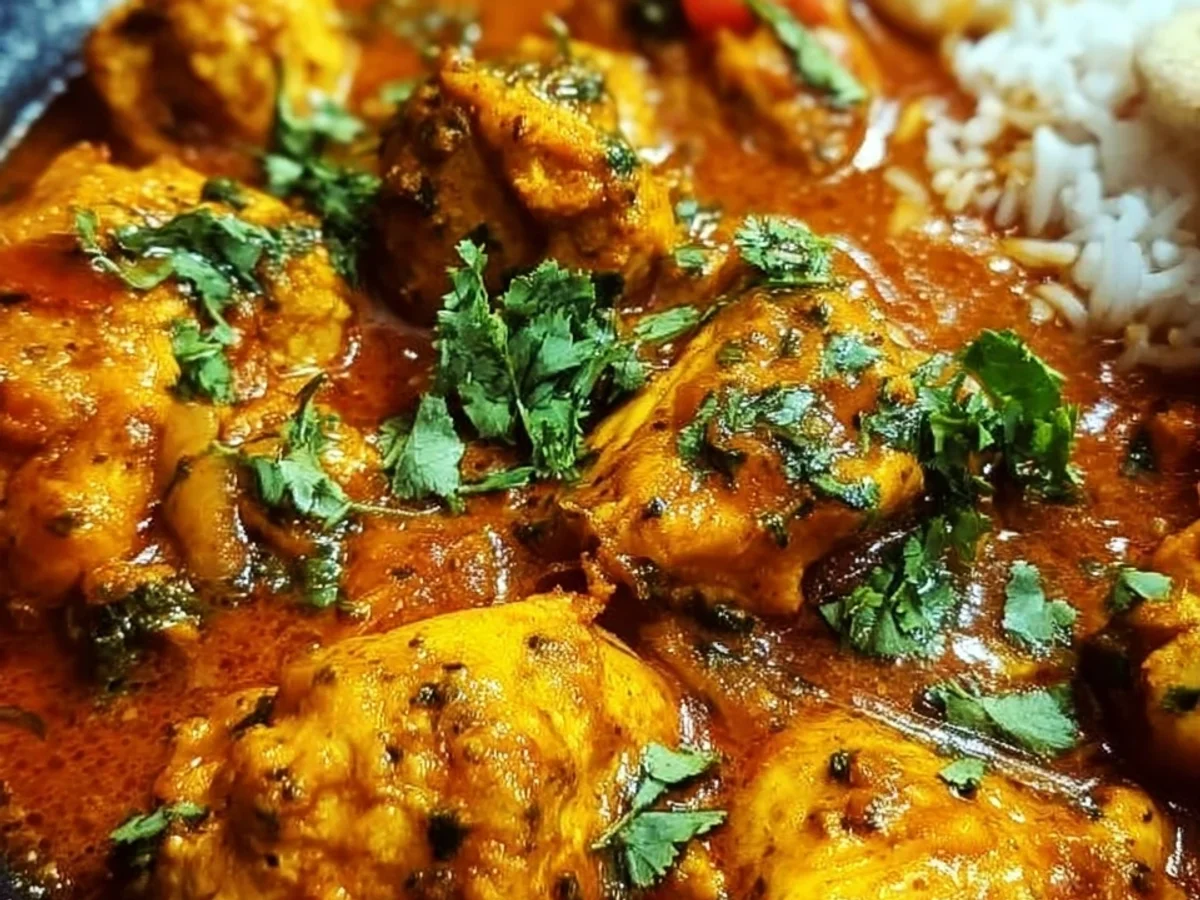
- Almost there! Take the pot off the heat. Stir in a few tablespoons of plain yogurt (full-fat, please!) for that creamy, slightly tangy finish. This also helps cool it down and adds a lovely richness. Give it a good stir, then let it sit for a few minutes, allowing the flavors to meld even further. Garnish with fresh cilantro, maybe a squeeze of lime. Voila! Your homemade Indian Chicken Curry is ready to shine. Get ready for some serious compliments!
There's something so incredibly satisfying about watching all these individual ingredients transform into this vibrant, fragrant Indian Chicken Curry. The way the kitchen fills with the scent of toasted spices, the bubbling sound of the simmer… it's pure culinary therapy for me. Every time I make it, I’m reminded of how much I love cooking from scratch, creating something truly special from simple components. It’s a labor of love, for sure.
Storing Your Delicious Indian Chicken Curry
Okay, so you’ve made a big batch of this amazing Indian Chicken Curry (smart move!). Storing it properly means enjoying it for days. Once it's completely cooled down and I mean completely, leaving it out warm is where bacteria can party, oops! transfer it to airtight containers. It'll last beautifully in the fridge for up to 3-4 days. For longer storage, this curry freezes like a dream! Portion it out into freezer-safe containers or bags, leaving a little headspace. It's good in the freezer for up to 3 months. Just thaw it overnight in the fridge and gently reheat on the stovetop. I once tried to microwave it from frozen, and let's just say it was... unevenly heated. Learn from my mistakes!

Playing with Ingredients in Your Indian Chicken Curry
I've played around with this recipe so much! If chicken thighs aren't your jam, boneless, skinless chicken breast will work, but it tends to dry out faster, so keep an eye on it and maybe reduce the simmer time a bit. For the ghee, if you're vegan or just don't have it, a good quality vegetable oil or coconut oil is a fine swap, though you'll miss that nutty depth. Want more veggies? I've tossed in diced potatoes or bell peppers during the last 15 minutes of simmering, and it's always a winner. And if Kashmiri red chili powder is hard to find, paprika works for color, or a tiny pinch of cayenne for heat. Don't be afraid to experiment, that's how we find our favorites!
Serving Up Your Indian Chicken Curry with Style
Alright, you've lovingly crafted this incredible curry, now let's serve it right! My absolute go-to is fluffy basmati rice it's the perfect canvas for soaking up all that amazing sauce. Warm, pillowy naan bread is also a must for scooping up every last drop, honestly. For a refreshing contrast, I always whip up some simple raita (yogurt with cucumber and a little cumin) or a quick kachumber salad (diced onion, tomato, cucumber with lemon). A sprinkle of fresh cilantro on top is non-negotiable for that pop of color and freshness. And if you're feeling fancy, a crisp, cold lager or a glass of dry Riesling pairs surprisingly well. Enjoy every single bite, you earned it!
The Heart and Soul of Indian Chicken Curry
Curry is such a broad, beautiful term, encompassing so many incredible dishes from India and beyond. This particular Indian Chicken Curry draws inspiration from the rich, aromatic gravies popular in North India, often characterized by a base of onions, ginger, garlic, and a blend of earthy spices. It's a testament to centuries of culinary evolution, where regional ingredients and cooking techniques have created countless variations. For me, connecting with this dish isn't just about the flavors, it's about appreciating the history, the families who've passed down these recipes, and the vibrant culture behind it all. It’s a delicious way to explore the world right from my own kitchen, and I hope it sparks that same curiosity for you.
Well, there you have it, my friend! My heart and soul poured into this Indian Chicken Curry recipe for you. I hope you feel the love and passion that went into every step. It’s truly one of my favorite dishes to make, and I can't wait for you to try it. If you make this, please, please share your photos and tell me all about it in the comments below! Happy cooking!

FAQs About Making Indian Chicken Curry at Home
- Can I make this Indian Chicken Curry less spicy?
Absolutely! The green chili and Kashmiri red chili powder are where most of the heat comes from. You can omit the green chili entirely, or use less. For the red chili powder, swap it for sweet paprika if you want zero heat but still that lovely color. Taste as you go, and adjust to your preference!
- Is it okay to use chicken breast instead of thighs?
Yes, you can, but be mindful of the cooking time! Chicken breast tends to dry out faster. I’d recommend cutting it into slightly larger pieces and reducing the simmer time to about 15-20 minutes, checking for doneness. Thighs just stay so much juicier and absorb flavors better, in my opinion, but breast will work.
- Can I make this curry ahead of time?
Oh, yes, and you totally should! This Indian Chicken Curry actually tastes even better the next day, as the flavors have more time to meld and deepen. Just cool it completely, store it in an airtight container in the fridge for up to 3-4 days, and gently reheat on the stovetop. It's perfect for meal prep!
- What if my curry sauce is too thin or too thick?
If it's too thin, you can simmer it uncovered for a bit longer to reduce. If it's too thick, simply add a splash of water or chicken broth until it reaches your desired consistency. Remember, the consistency can also change slightly after adding the yogurt, so adjust after that step.
- What's the trick to getting those onions perfectly golden?
Patience, my friend, patience! Use medium-low heat and stir frequently. It's better to go slow and let them caramelize gently than to rush and burn them. This step can take 15-20 minutes, but it builds so much flavor, it's worth every minute. Don't let them get dark brown, just a lovely golden hue.