

Remember those fun evenings at the hibachi grill? The sizzling, the chef's knife skills, the onion volcano! I always loved the fried rice there, honestly, maybe more than the main course sometimes. For years, I thought making that kind of fried rice at home was just too much work, too fancy. My kitchen, usually a chaotic but happy space, felt miles away from that restaurant magic. Then, one rainy Tuesday, after a particularly long day, I just had to try. I messed up the first batch, naturally rice too mushy, not enough sizzle. But after a few tries, I cracked the code for truly flavorful and Easy Hibachi Style Fried Rice right here in my own home. It’s become a go-to for when I need that comfort without the fuss.
I remember one time, trying to get that perfect restaurant-style 'egg ribbon' effect. I poured the egg in, got distracted by my cat trying to jump on the counter (classic kitchen chaos!), and next thing I knew, I had a giant, scrambled egg pancake instead. Oops! It still tasted amazing chopped up and mixed in, but it wasn't quite the elegant swirl I was going for. That's the beauty of home cooking, though, right? Even when it's not 'perfect,' it's still delicious, and you learn something new every time you make this Easy Hibachi Style Fried Rice.
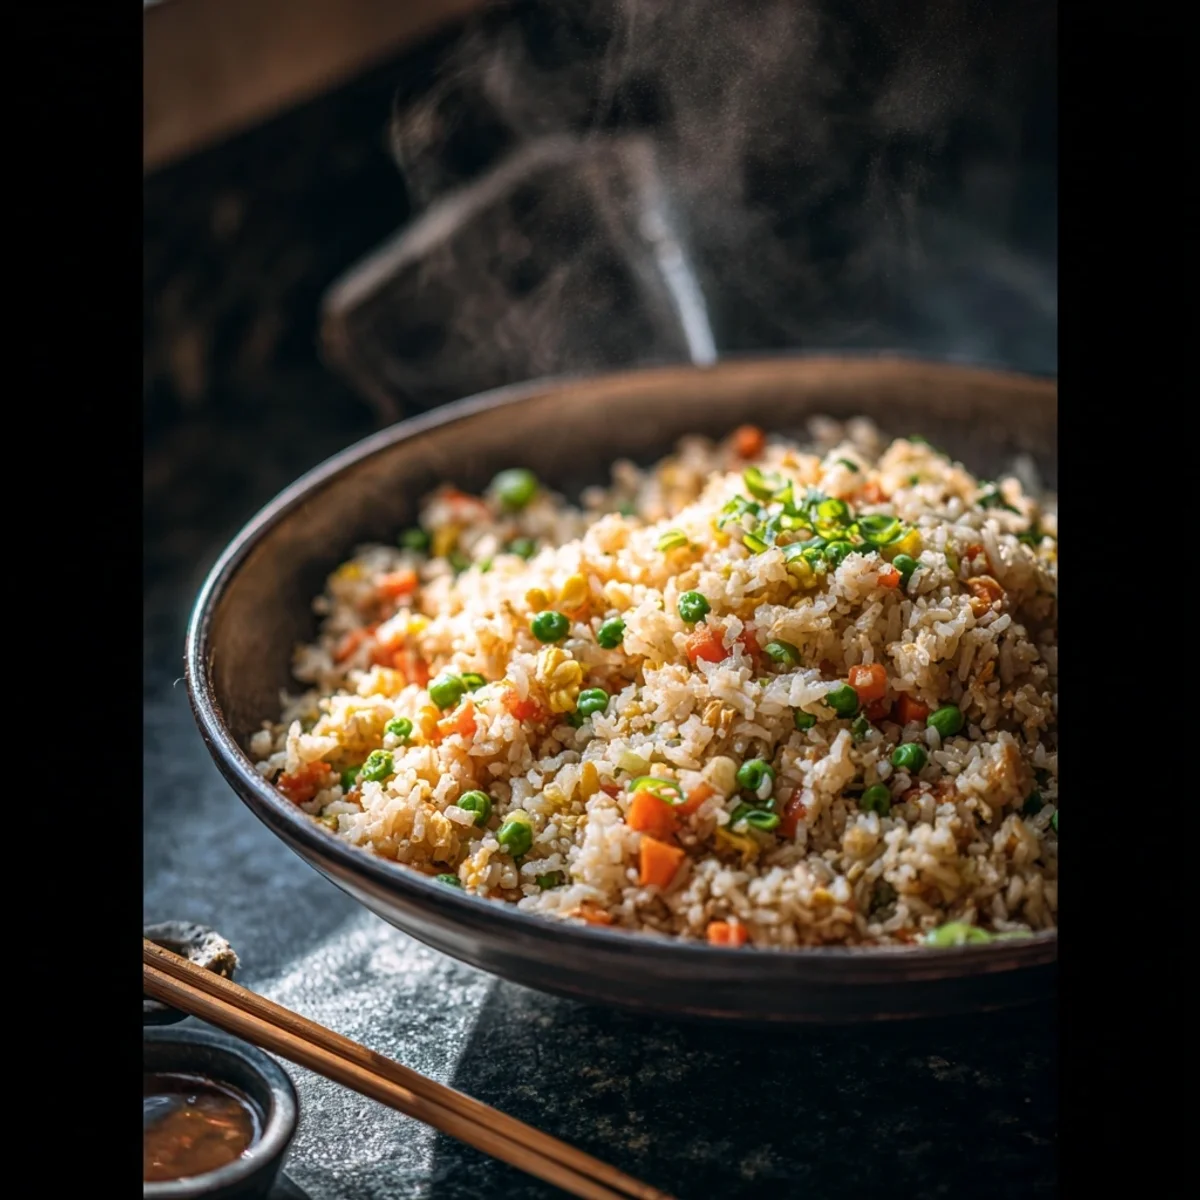
Ingredients for Easy Hibachi Style Fried Rice
Base Ingredients for Your Fried Rice
- Cooked Day-Old Rice: This is non-negotiable, honestly. Freshly cooked rice is too moist and will turn into a sticky mess. Day-old (or even two-day-old!) rice dries out just enough to get those perfectly separate, slightly chewy grains. I usually cook extra rice for dinner the night before specifically for this.
- Eggs: For that classic hibachi flavor and texture. I like to scramble them lightly and cook them separately before adding them back in. Don't overcook them, or they'll be rubbery a mistake I've made too many times.
- Butter: Oh, the butter! It's what gives hibachi fried rice that rich, savory depth. Don't skimp here, it makes all the difference. I tried using just oil once, and it worked... kinda, but it lacked that signature buttery flavor. Use real butter, please!
- Onion & Garlic: The aromatic foundation. These two bring so much flavor to the party. I typically use a yellow onion, finely diced. And for garlic, I'm a 'more is more' kind of person, so I usually add an extra clove or two beyond what the recipe says. Fresh is always best here, you can really smell the difference as they hit the hot pan.
- Carrots & Peas: These add a touch of sweetness, color, and texture. I always have a bag of frozen peas and carrots in my freezer for quick additions like this. It reminds me of my grandma's kitchen, she always added them to her rice dishes.
- Green Onions: A fresh, sharp finish. They add a lovely mild onion flavor and a pop of green. I love the way they smell when you chop them, so fresh and vibrant.
Flavor Boosters for Easy Hibachi Style Fried Rice
- Soy Sauce: The main seasoning agent. I prefer a low-sodium soy sauce so I can control the saltiness myself. You can always add more, but you can't take it away! I once added too much and had to toss the whole batch, a real bummer.
- Sesame Oil: A tiny bit goes a long way for that distinct, nutty aroma. Add it at the very end to preserve its delicate flavor. I made the mistake of adding it too early once, and the aroma just cooked out.
- Oyster Sauce (optional): This adds a fantastic umami depth. If you're vegetarian, you can use a mushroom-based vegetarian oyster sauce, which I've tried and it works surprisingly well!
- White Pepper: A subtle but important spice for authentic flavor. It's milder than black pepper but gives a lovely warmth.
How to Make Easy Hibachi Style Fried Rice
- Prep Your Ingredients:
- First things first, get everything ready before you even think about turning on the stove. This is called 'mise en place' and honestly, it's a game-changer for stir-fries. Chop your onion, mince your garlic, dice your carrots if using fresh ones, and whisk your eggs. Have your day-old rice ready to go. Trust me, the minute you start cooking, things move fast, and you don't want to be scrambling for ingredients. I always forget to dice my green onions until the last minute, leading to a frantic chop while everything else is sizzling away.
- Scramble Those Eggs:
- Heat a little butter or oil in your large skillet or wok over medium-high heat. Pour in your whisked eggs and quickly scramble them until they're just set but still soft. You're aiming for small, fluffy pieces. Once cooked, immediately remove them from the pan and set them aside. This is where I messed up and got that egg pancake! Don't overcook them, or they'll get tough. We want tender egg bits in our Easy Hibachi Style Fried Rice.
- Sauté the Veggies:
- Add a bit more butter to the hot pan. Toss in your diced onions and carrots. Sauté them for about 2-3 minutes until they start to soften and you can smell that sweet oniony aroma filling your kitchen. Then, add the minced garlic and peas, cooking for another minute until fragrant. Don't let the garlic burn, it gets bitter super fast, and that's a mistake I've made more than once. Keep things moving!
- Add the Rice:
- Now for the star of the show! Push your veggies to one side of the pan. Add the day-old rice to the empty side, breaking up any clumps with your spatula. Let the rice sit undisturbed for a minute or two to get a slight crisp, then stir it into the veggies. Keep stirring and tossing for about 3-5 minutes, ensuring every grain gets coated and heated through. This is where the magic happens, and you can smell the rice toasting!
- Season and Combine:
- Pour the soy sauce and oyster sauce (if using) evenly over the rice. Sprinkle in the white pepper. Add your cooked scrambled eggs back into the pan. Stir everything together really well, making sure all the flavors are mingling. This step is about integrating everything. I sometimes add a tiny splash more soy sauce here if it feels like it needs it, but taste as you go!
- Finishing Touches for Your Easy Hibachi Style Fried Rice:
- Turn off the heat. Drizzle in the sesame oil remember, it’s for aroma, so add it at the end. Stir once more. Garnish with those fresh green onions you (hopefully!) remembered to chop. The final result should be a beautiful, fragrant, savory bowl of fried rice with distinct grains and tender veggies. It's so satisfying to see it come together, especially after a long day.
Cooking this Easy Hibachi Style Fried Rice always brings a smile to my face. There's something so satisfying about transforming simple ingredients into something so delicious, with all those fun sizzles and smells. Sometimes, I even pretend I'm a hibachi chef, flipping the rice with a flourish (and usually making a bit of a mess, but hey, that's part of the charm!). It's a dish that feels special, even when it's just a quick weeknight dinner.
Storing Your Easy Hibachi Style Fried Rice
Leftovers of this Easy Hibachi Style Fried Rice are actually fantastic, often tasting even better the next day as the flavors meld. Just make sure you cool it down quickly after cooking, within an hour, and store it in an airtight container in the refrigerator. I once left it out too long on the counter after dinner, totally forgot about it, and had to toss it the next morning a rookie mistake! It'll keep well for about 3-4 days. When reheating, I usually pop it in the microwave with a tiny splash of water or, better yet, stir-fry it again in a hot pan with a little bit of oil or butter until heated through. That second pan-fry really brings back the texture. Avoid microwaving it too long without stirring, or parts can get dry.

Ingredient Substitutions for Easy Hibachi Style Fried Rice
Life happens, and sometimes you just don't have everything on hand, right? For the protein, I've tried adding leftover cooked chicken or shrimp, and it works beautifully just toss it in during the last few minutes to heat through. If you don't have peas and carrots, corn or diced bell peppers are good substitutes, I tried finely chopped broccoli once, and it worked... kinda, but it needed to be cooked longer. For oyster sauce, if you're out or vegetarian, a dash of extra soy sauce with a pinch of sugar and a tiny bit of mushroom powder can mimic that umami depth. I even used tamari instead of soy sauce for a gluten-free friend, and honestly, you couldn't tell the difference! Don't be afraid to experiment with what's in your fridge.
Serving Suggestions with Your Hibachi Style Fried Rice
This Easy Hibachi Style Fried Rice is a star on its own, but it also plays well with others! I love serving it alongside simple grilled chicken or pan-seared salmon for a complete meal. A light cucumber salad with a sesame dressing is a refreshing contrast. For drinks, a crisp iced tea or even a cold beer feels just right with this savory dish. And for dessert? Maybe some mochi ice cream or a simple bowl of fresh fruit. This dish and a good action movie? Yes please! It’s versatile enough for a quick lunch or a more elaborate dinner spread. Sometimes, I even just eat it straight from the pan, no apologies.
Cultural Backstory of Hibachi Style Fried Rice
While fried rice has roots deep in chinese cuisine, the hibachi-style version we know and love actually comes from Japanese-American steakhouses. It’s a fusion, a brilliant adaptation created to appeal to American palates, often cooked right in front of you on a large, flat griddle (the hibachi grill!). My first experience was at a birthday party, watching the chef make that incredible onion volcano, and I was hooked. It wasn't just food, it was entertainment! This version brings that restaurant experience home, using familiar ingredients to recreate those memorable flavors and textures. It’s a testament to how food traditions evolve and bring joy across cultures, and it’s become a comforting part of my own kitchen's story.
Honestly, making this Easy Hibachi Style Fried Rice feels like a little victory every time. It’s a dish that’s seen me through busy weeknights and quiet evenings, always delivering that satisfying, savory goodness. I love that it’s so adaptable, letting me use whatever veggies I have on hand. Watching those grains sizzle and smell that amazing aroma… it just makes my kitchen feel like the happiest place. I really hope you give it a try and make it your own. Let me know what quirky additions you discover!

Frequently Asked Questions
- → Can I use freshly cooked rice for Easy Hibachi Style Fried Rice?
Honestly, I wouldn't recommend it. Fresh rice has too much moisture and will likely turn into a gummy mess, not that fluffy, separate grain texture you want. I learned this the hard way! Day-old, cold rice is the secret weapon here, trust me.
- → What if I don't have oyster sauce for this Easy Hibachi Style Fried Rice?
No worries! You can skip it. I've made it without plenty of times. For a similar umami depth, you could add a tiny bit more soy sauce, maybe a pinch of sugar, and if you have it, a dash of mushroom powder. It works pretty well, kinda.
- → How do I get that smoky 'wok hei' flavor in my Easy Hibachi Style Fried Rice?
The trick is a super hot pan and not overcrowding it. I crank my stove to high and let the pan get screaming hot before adding anything. Cook in batches if you need to. It's all about that quick, intense sizzle, avoiding steaming the rice.
- → How long does Easy Hibachi Style Fried Rice last in the fridge?
It usually lasts 3-4 days in an airtight container in the fridge. Make sure to cool it quickly after cooking. I've had it stretch to 5 days once, but that might have been pushing it a bit! Reheating in a pan helps bring back some of the texture.
- → Can I add other proteins to this Easy Hibachi Style Fried Rice recipe?
Absolutely! I often throw in leftover cooked chicken, shrimp, or even some thinly sliced beef. Just add them in the last few minutes to heat through. Tofu works too! It’s super adaptable, so go wild with your favorite additions.